Chocolate Cherry Protein Shake

Chocolate Cherry Protein Shake | My Engineered Nutrition

As far as recipes with protein powder go, I feel like I've practically tried my hand at everything. Plenty of pro-nuts, cakes, brownies, muffins, pancakes and more...but no protein shakes. Truthfully, I hardly ever drink them (gasp!). If I'm honest, I can't stand the taste of a simple protein shake made from whey powder and water. Bleh. I just would much rather eat something with protein than drink it. My secret is out. This is why I haven't ever once done a recipe for a smoothie or shake.

Chocolate Cherry Protein Shake | My Engineered Nutrition

Well, today that changes. I may not love basic protein shakes, but you know what I do love? MILKSHAKES. Who doesn't? If you also don't like protein shakes (or maybe you do) and get down with some milkshakes, then you are going to love this Chocolate Cherry Protein Shake. 

Chocolate Cherry Protein Shake | My Engineered Nutrition

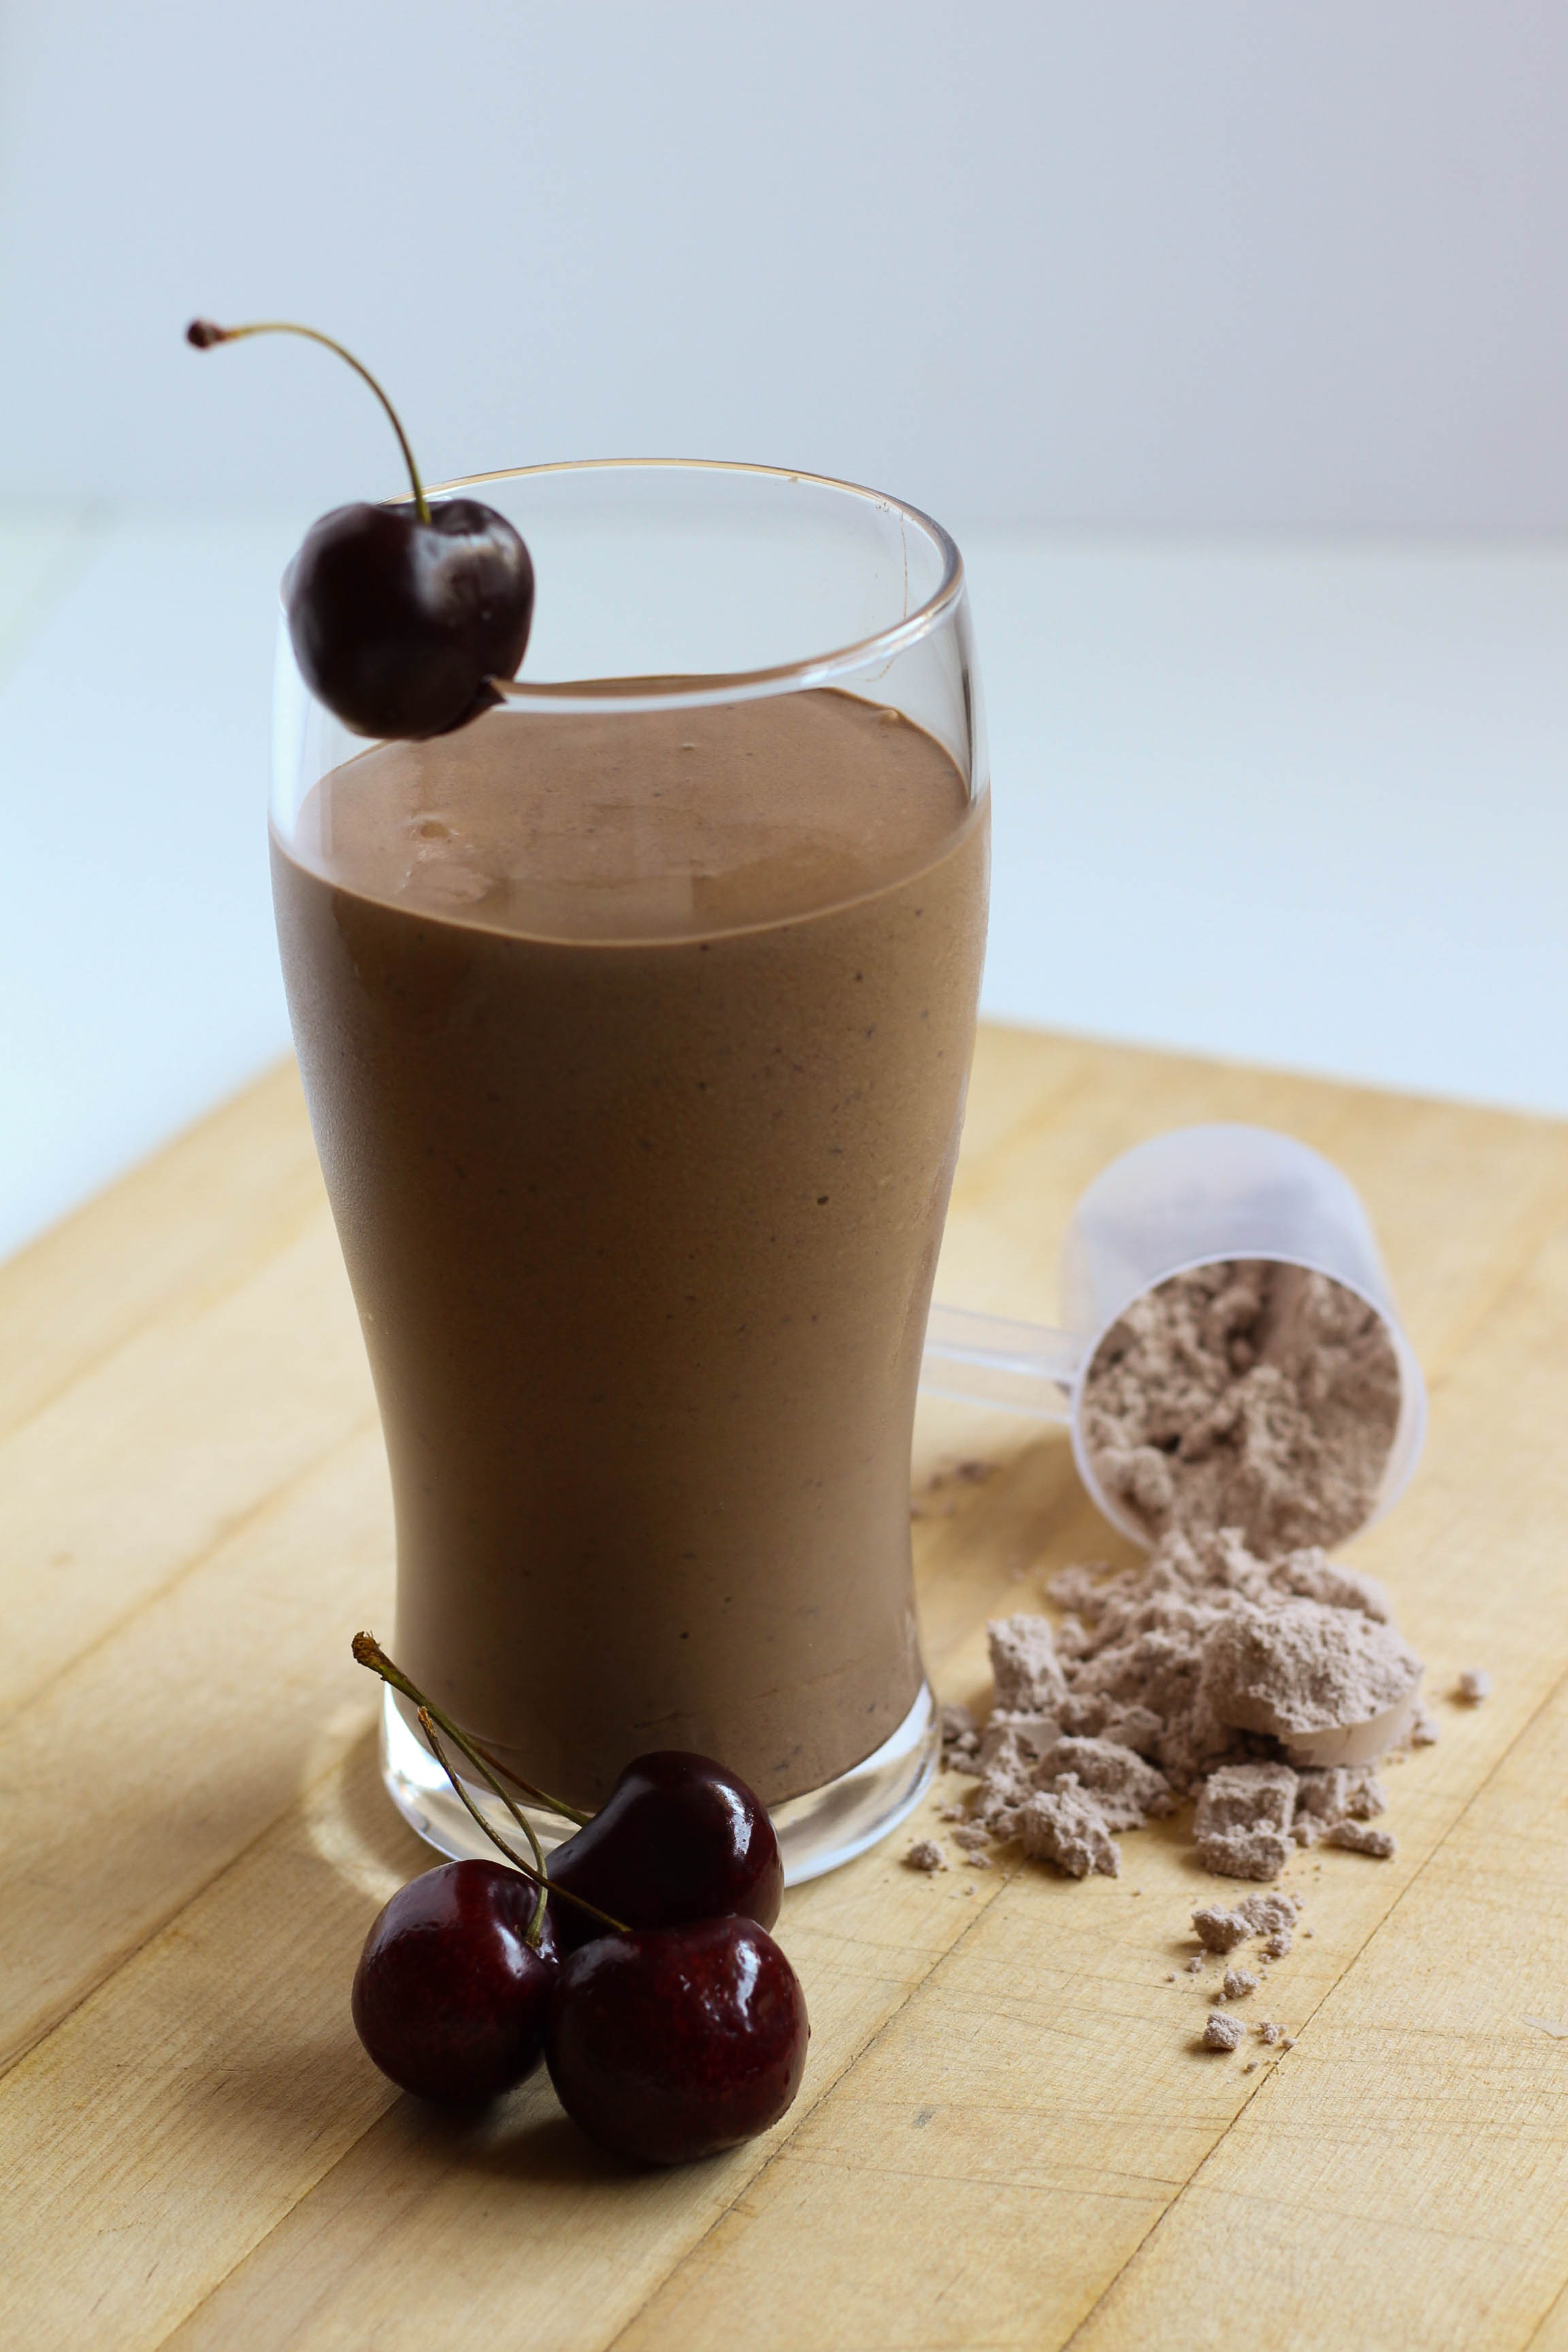
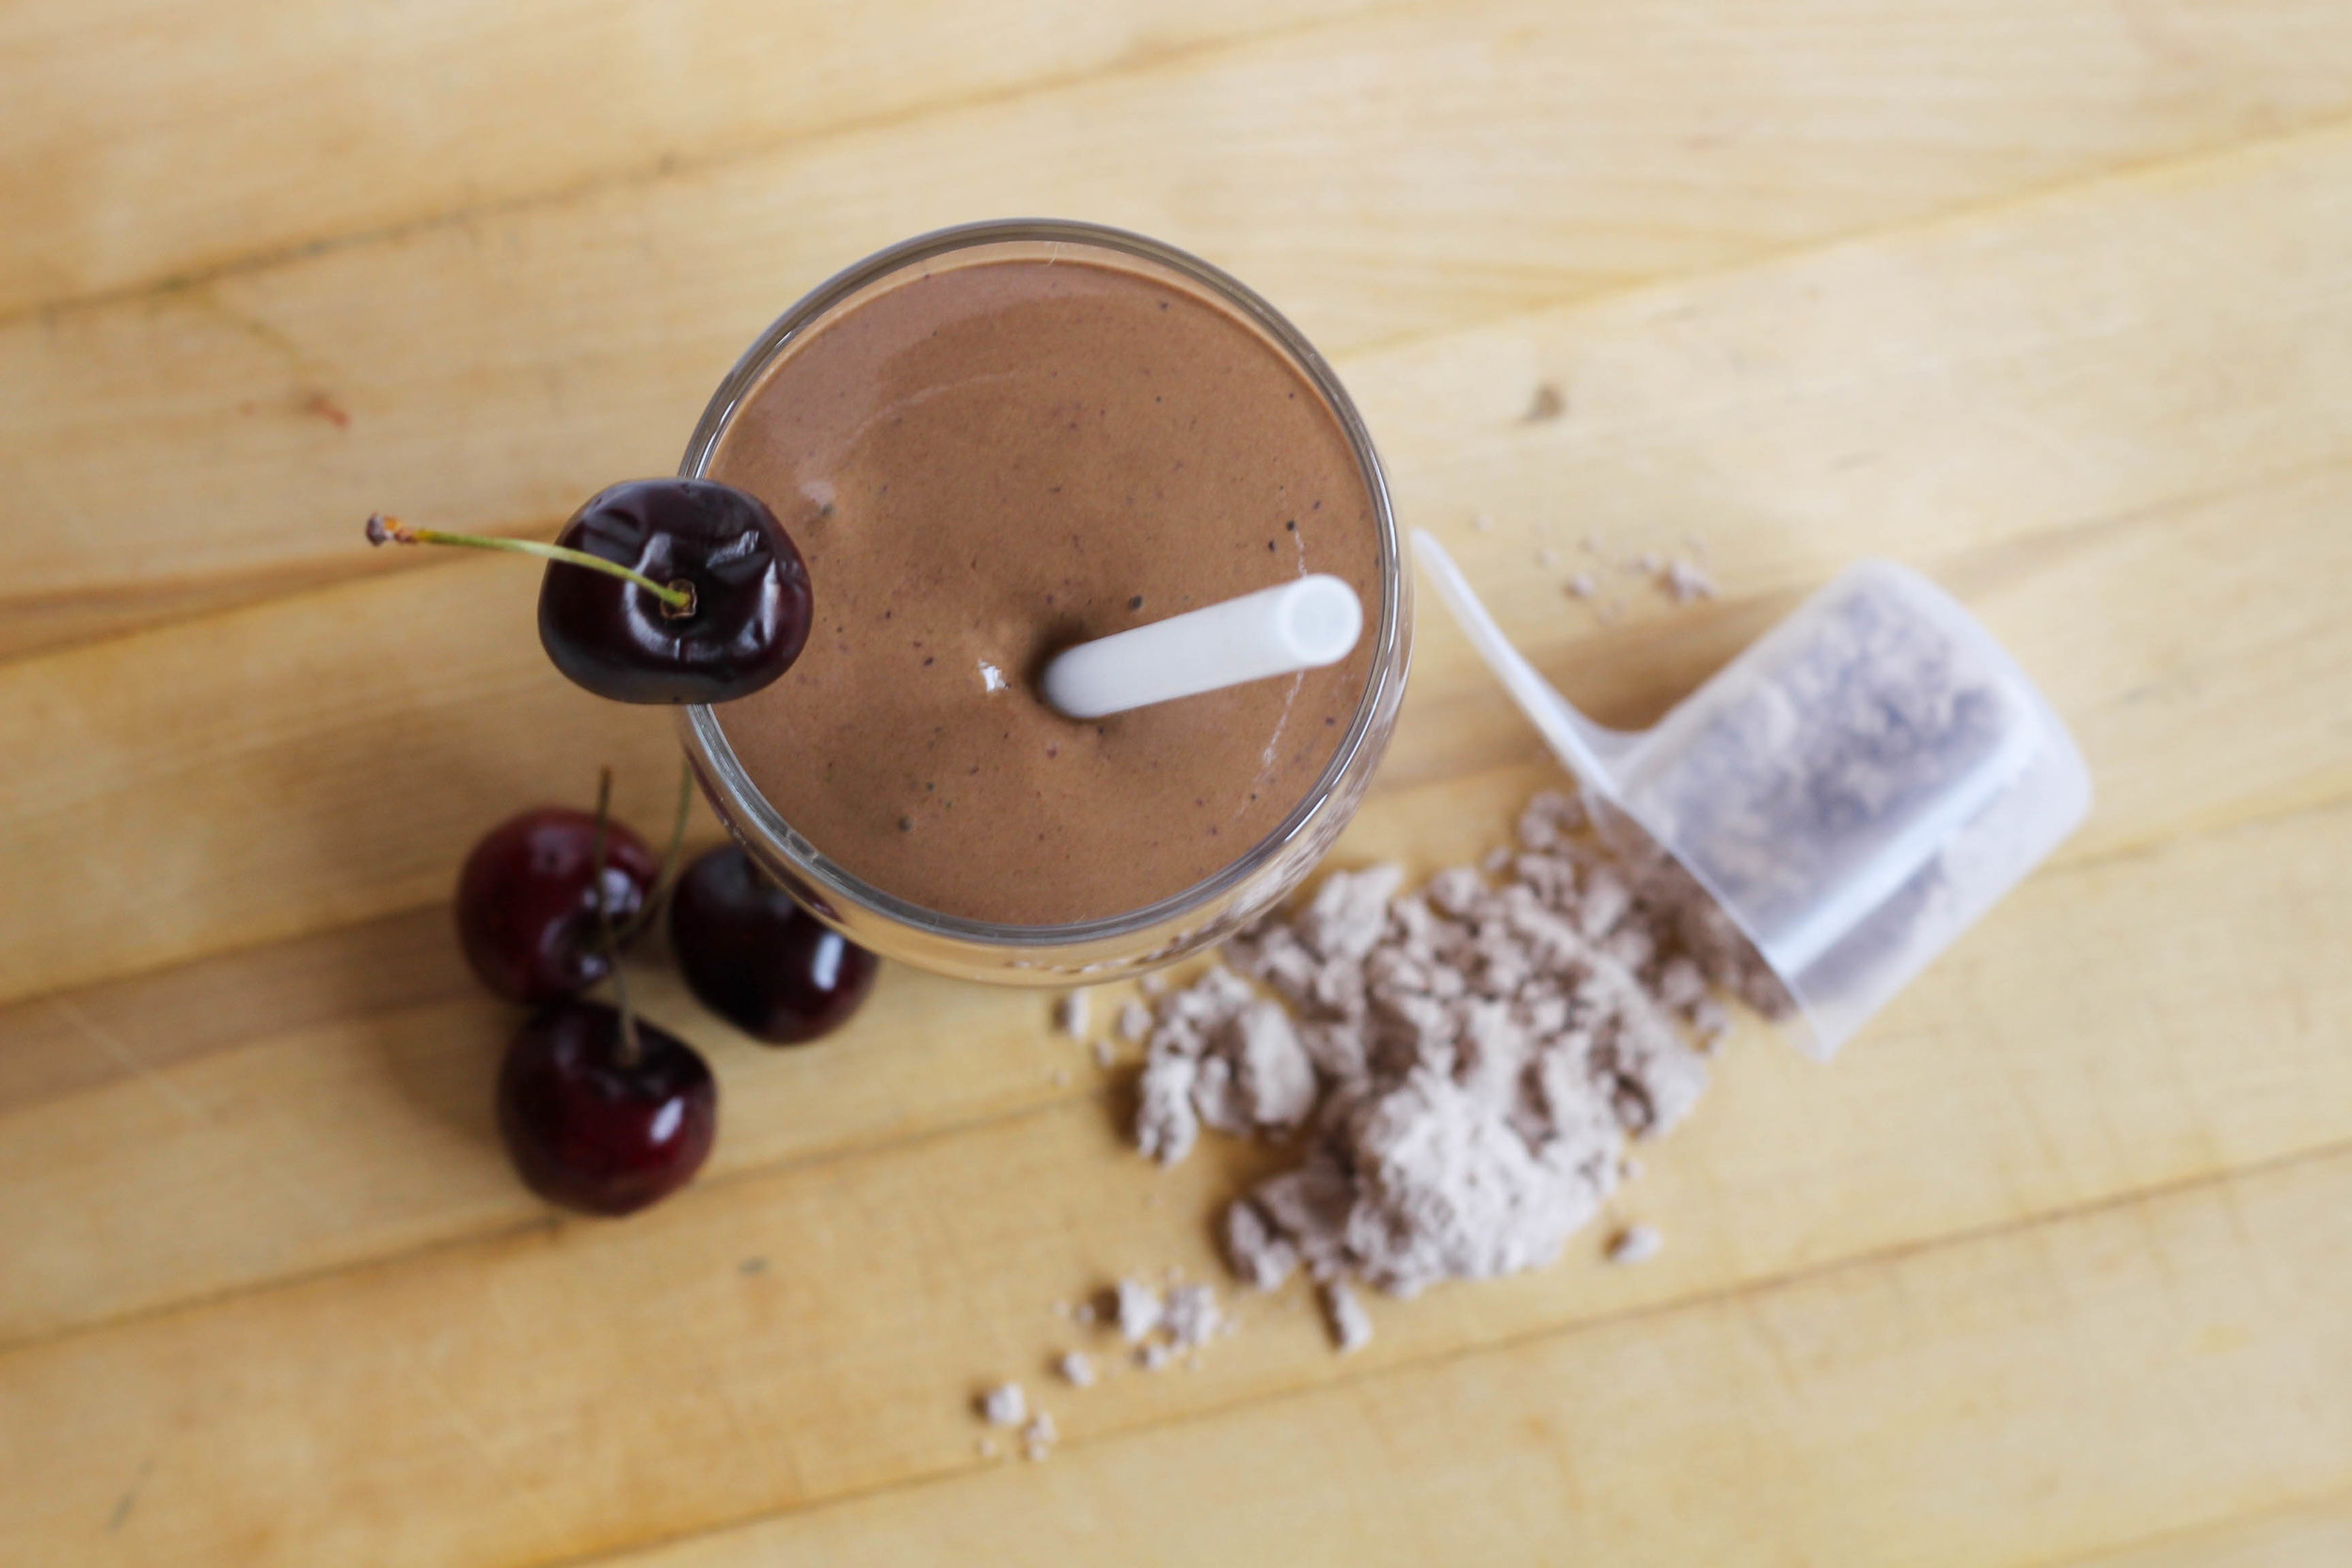
The base of this shake is Chocolate Fudge Micellar Casein. If you are like me, you like your milkshakes as a dessert after dinner - or maybe you like them for breakfast, which is totally fine, no judgment here. Casein is a "slow" protein, meaning you absorb it much slower than whey protein. Slow rate of protein breakdown is great for muscle recovery, aka when we are sleeping.

But don't let this shake foul you, it may taste like a milkshake but it is actually packed with antioxidants! First, it has cacao powder, not to be confused with cocoa. Cacao is made from un-roasted raw cocoa beans, high in antioxidants, no sugar, and even some fiber. I also snuck in some spinach to provide an extra boost of antioxidants, vitamins and minerals, plus you won't even know it's there.  Last but certainly not least, let's not forget about the cherries which are also packed with antioxidants, contain cancer-preventative compounds and also naturally contain melatonin which aids in sleep! 

Chocolate Cherry Protein Shake | My Engineered Nutrition

This shake is thick and creamy and you will hardly believe it yourself that it is actually SO GOOD for you! I may just have to start making this a nightly routine... 

Chocolate Cherry Protein Shake

Prep Time: 5 minutes

Servings: 1 shake

Ingredients:

*This makes for a very thick shake. If you prefer a thinner consistency, simply add more milk to your liking!

Directions: 

  1.  Add all ingredients to blender and blend until creamy!

Nutritional Information (1 shake)

305 calories - 34.5 g Protein, 31 g Carbohydrates, 4.8 g Fat


Lemon Pistachio Protein Donuts

Lemon Pistachio Donuts | My Engineered Nutrition

Oh.

My. 

Goodness.

These donuts. I just don't even have the words.

Lemon Pistachio Donuts | My Engineered Nutrition

Let me try and find them: LEMON. PISTACHIO. PROTEIN. DONUTS. 

Even though I made them myself, it is hard to believe how amazing these taste when they are made with protein powder. I mean, let's not fool ourselves - baking with protein powder is GREAT, but its never quite the real deal. But I swear to you, if you didn't know how these were made you would think I picked them up from a near by donut shop. 

Lemon Pistachio Donuts | My Engineered Nutrition

I will admit that I had my doubts I could ever get this recipe exactly spot on like I wanted it. The first attempt the batter had too much liquid and they baked flat and rubbery. The second attempt I almost had but it they were a little dry, however, still definitely edible, I just wasn't sold on the glaze. This third attempt I was determined to nail it and boy did I. 

I will say I tried so hard to make a "healthy" glaze for these donuts by using minimal sugar and even some whey protein powder in the mix, but it just wasn't the consistency I wanted. So I compromised and made a traditional glaze with powdered sugar and milk...but used it oh-so-sparingly. I try my hardest to steer clear of refined sugars but you know what, sometimes you gotta give a little.

Aside from the glaze these are incredibly healthy donuts! The lemon zest and lemon juice make these the ideal summertime donut as their flavor is bright and bursting with with citrus. Each donut packs 8 grams of protein and less than 5 grams of fat. It is hard to believe something that taste THIS good is actually healthy. Don't believe me? You'll just have to see for yourself!

Lemon Pistachio Protein Donuts | My Engineered Nutrition

Lemon Pistachio Protein Donuts

Prep Time: 15 minutes

Bake Time: 8 minutes

Servings: 6 donuts

Ingredients:

Donuts

  • 1/4 cup  vanilla whey protein powder (I use Whey Protein Isolate from True Nutrition)
  • 1/2 cup all-purpose flour (I use Bob's Red Mill Gluten Free All Purpose)
  • 2 tbsp coconut palm sugar 
  • 1/4 tsp baking soda
  • 1/4 tsp baking powder
  • 1/4 tsp salt
  • 1 tbsp butter, melted
  • 1/4 cup nonfat Greek yogurt
  • 1 egg
  • 1/2 tsp vanilla
  • Zest of 1 lemon (approx. 2 tbsp)
  • 1 tbsp lemon juice

Glaze

  • 3 tbsp powdered sugar, loosely measured not hard packed
  • 2 tsp milk (or nondairy milk of your choice, I used cashew)

Additional Toppings

  • 2 tbsp pistachios, toasted

Directions: 

  1.  Preheat oven to 350°F. Grease donut pan with coocnut oil (just so the donut don't stick to pan) and set aside. 
  2. Mix all dry ingredients (protein powder, flour, coconut palm sugar, baking soda, baking powder and salt) together in a large mixing bowl. In a smaller bowl, combine wet ingredients (butter, lemon juice, lemon zest, yogurt, egg and vanilla) and whisk together. Add wet ingredients to the dry and whisk together until well incorporated. 
  3. Transfer batter to a large Ziploc bag - we will use this as a piping bag. Snip a very small hole in one of the bottom corners of the bag and evenly pipe batter into donut pan. I like to tab the pan on my counter top to level out the batter and ensure there are no air bubbles. 
  4. Transfer donuts to oven to bake for 8 minutes or until a toothpick in inserted into the donut and comes out clean. Make sure not to over bake since we are using whey protein and over baking and make your donuts dry and rubbery!
  5. After the donuts have finished baking, remove pan from oven and remove donuts from pan for cooling. 
  6. While donuts are cooling, prepare the glaze. In a small bowl add 1 tsp of milk at a time to the powdered sugar, stirring after each tsp of milk. If you haven't already toasted your pistachios, now would be the time to toast them. Once cooled, chop the pistachios finely.
  7. With a spoon, drizzle equal amounts of glaze over the tops of the cooled donuts. Sprinkle chopped pistachios over each right after the glaze.
  8. Serve immediately or store in an airtight container, placed in the refrigerator.

Nutritional Information (1 donut)

145 calories - 8 g Protein, 17.5 g Carbohydrates, 4.7 g Fat

Apple Cinnamon Protein Coffee Cake

Apple Cinnamon Protein Coffee Cake | My Engineered Nutrition

I always find it hard to say what my FAVORITE recipe is. There are just too many great ones to choose from, plus it is usually highly dependent on my mood and hunger level. 

That, of course, was before this creation: Apple Cinnamon Protein Coffee Cake. Sure, it's a mouthful for a recipe title, but believe me - you will want mouthful after mouthful of this delicious and guilt-free coffee cake!

Apple Cinnamon Protein Coffee Cake | My Engineered Nutrition

This coffee cake is great for an on-the-go breakfast, but you can also dress it up and serve it for a brunch party. I recently made this for a few girlfriends that came over for brunch and it was a hit! While this cake may seem like an indulgence, it is packed with protein (14 g per slice!) making it far healthier than any other morning pastry. The apples help to keep this coffee cake incredibly moist which is usually hard to achieve when baking with whey protein. What really makes this coffee cake is the walnut streusel topping! It is the perfect finishing touch to this healthy breakfast treat. 

I love that this is such a simple baked good. I know some of my other recipes can take a little more effort with muffin tins or donut pans but with this you literally mix everything in one bowl together and dump it into a single cake pan. 

Apple Cinnamon Protein Coffee Cake | My Engineered Nutrition

 I've recently switched up my training and I'm almost exclusively training at 6am everyday before work. I forgot how much I love that burst of endorphins before work, not to mention how focused I am all morning. I don't eat breakfast prior to lifting (I actually prefer weight training fasted first thing!) but I do have my coffee with collagen and MCT oil following. This coffee cake is perfect to have with my coffee after a hard morning workout!

Well, now that the secret is out and you know what my favorite recipes is I hope you give this a try! 

Psst! This recipe uses True Nutrition Cinnamon Bun Whey Protein and I can't recommend this protein enough. I really do stand by their products and I know I'm getting a high quality protein powder at an extremely affordable price. Want to give it a try? Use the code 'MYENG' at checkout for 5% off your entire order!

Apple Cinnamon Protein Coffee Cake | My Engineered Nutrition

Apple Cinnamon Protein Coffee Cake

Prep Time: 30 minutes

Bake Time: 25-30 minutes

Servings: 10 slices

Ingredients: 

  • 3 scoops True Nutrition Cinnamon Bun Whey Protein (3/4 cup)
  • 1-1/4 cup gluten free all-purpose flour (I used Gluten Free Baking Flour but typical all-purpose flour will work as well)
  • 2 tbsp coconut palm sugar
  • 2 tsp baking powder
  • 1/2 tsp baking soda
  • 1/4 tsp salt
  • 1 tsp cinnamon
  • 2 medium green apples, peeled, cored and diced
  • 1 cup nonfat Greek yogurt
  • 2 egg
  • 1/2 cup applesauce, unsweetened
  • 2 tbsp butter, melted
  • 1 tsp vanilla

Walnut Streusel Topping

  • 1/4 cup toasted walnuts, chopped
  • 1/2 tsp cinnamon
  • 2 tbsp all-purpose flour
  • 2 tbsp coconut palm sugar
  • 1 tbsp butter

Baking Accessories:

  • 9 inch cake pan

Directions:

  1. Preheat oven to 375°F. Prepare cake pan by greasing with coconut oil or butter. Set aside.
  2. Toast walnuts by spreading them out on a baking sheet and placing in oven for 5-10 minutes. Be sure to keep a close watch on them so not to burn!
  3. In a small bowl combine the remaining streusel topping ingredients. Cut the butter into very small pieces and then add to the dry ingredients. Mix with a fork until the butter has formed into small balls and is well coated. If necessary use fingers. Add toasted walnuts and continue to mix. Set aside.
  4. In a mixing bowl combine your dry ingredients: whey protein, flour, coconut palm sugar, baking powder, baking soda, salt and cinnamon.
  5. In a stand mixer or large mixing bowl with hand mixer, combine your wet ingredients: greek yogurt, eggs, applesauce, melted butter and vanilla. Mix at medium speed until well combined. Add dry ingredients and mix and medium speed until incorporated. 
  6. Fold apples into batter with a spatula until apples are evenly mixed in.
  7. Pour batter into greased pan. Sprinkle walnut streusel topping on top of the cake. Bake for 25 - 30 mins or until a toothpick inserted into center comes out clean. Be sure not to over bake the cake since there is whey protein in the batter and it could easily become dry and rubbery. Allow to cool 10 minutes before slices. Serve warm or store in air-tight container for later. 

Nutritional Information (1 slice):

210 calories - 13.5 g Protein, 23.5 g Carbohydrates, 6.7 g Fat

Greek Cauliflower Crust Pizza

To Celebrate My Engineered Nutrition's 2nd Birthday, I'm bringing it back with another Cauliflower Crust Pizza! The first recipe I started the website with, enjoy!

Greek Cauliflower Crust Pizza | My Engineered Nutrition

Can you believe that My Engineered Nutrition just turn TWO on May 5th?! 

If you are thinking "Wow! No I can't believe it!" you are in good company, as I couldn't believe it either. So much so, that the actual birthday came and went before I even realized it...

Greek Cauliflower Crust Pizza | My Engineered Nutrition

But after shortly realizing it was my baby website's birthday, I got to the kitchen and created something I hope you love as much as I do. It seemed fitting to celebrate the 2nd year of my blog with an original: Cauliflower Crust Pizza. That's right, I love my original BBQ Chicken Pizza so much I had to do a spinoff! While I would love to take credit for coming up with this idea all on my own, it was actually a recommendation by my bestie. I often turn to her to ask her what I should make next because she's made many of my recipes and we share similar tastes (i.e. we both love food...a lot). 

She mentioned that she's been into making Greek pizzas lately and I knew I had to copy that. I am part Greek after all, and I grew up eating this familiar profile of flavors. There is no traditional pizza sauce to be found on this pizza, instead the cauliflower crust is topped with olive oil and fresh garlic. Then, it is really a free form of whatever toppings you are feeling or have on hand! For this little number, I used feta cheese, artichoke hearts, kalamata olive, pepperoncini, red onions, grape tomatoes and basil...whew, that's a mouthful. You'll notice I don't have exact measurements for the ingredients below - let's not overcomplicate things. I've made things extra simple too with my step-by-step guide to making the Cauliflower Crust

Greek Cauliflower Crust Pizza | My Engineered Nutrition

Seeing that it IS My Engineered Nutrition's 2nd birthday, I figured I'd share some fun stats! I am an engineer after all, and I love nothing more than looking at analytics and numbers.

In total, I've had over 104,000 page views in the last 2 years. Wow. Just wow. THANK YOU to everyone who supports me in my fun little hobby. It means the world to me.

My Top 10 Recipes over the last 2 years were:

  1. Pumpkin Protein Donuts (over 18,000 views!!)
  2. Cajun Baked Salmon
  3. Sweet Potato Stacks
  4. Fluffy Protein Pancakes
  5. Banana Chocolate Chip Protein Muffins
  6. How to Build an EPIC Cheese and Charcuterie Board
  7. Coffee Cake Protein Muffins
  8. Roasted Chicken Breast
  9. Chocolate Coconut Protein Donuts
  10. BBQ Chicken Pizza with Cauliflower Crust

Some of these really surprised me for being in the Top 10 and others I'm not surprised at all. I did slow down at posting and only brought you 14 new recipes this year. I'm hoping to be more regular this year and my goal is to post at least two recipes per month! 

As always, I'd love to hear your suggestions for recipes! Shoot me an email at myengineerednutrition@gmail.com

Greek Cauliflower Crust Pizza | My Engineered Nutrition

Greek Cauliflower Crust Pizza

Prep Time: 20-25 minutes

Bake Time: 20-30 minutes

Ingredients

For the cauliflower crust

  • 1 small to medium head of cauliflower, yielding about 3.5 cups flowerets (350g)
  • 1/3 cup shredded fat-free or low-fat monterey jack cheese (1.5 oz)
  • 1 egg white
  • 1 tbsp coconut flour
  • 1 tsp italian seasoning (equal parts dried oregano, basil, thyme and rosemary)
  • 1/4 tsp salt

For the pizza toppings

  • 1 tsp extra virgin olive oil
  • 1 tsp fresh garlic, minced
  • Salt
  • 1 oz feta cheese, crumbed
  • Artichoke hearts (about 2 whole canned, sliced)
  • Red onion, sliced
  • Pepperoncini, sliced
  • Grape tomatoes, halved
  • Fresh basil, sliced
  • Kalamata olives, halved

Directions

First, start with the the cauliflower crust. You can follow my step-by-step instructions here: Cauliflower Crust How-To

  1. Preheat oven to 450°F. 
  2. Chop cauliflower into small flowerets, discarding of leavings and stem. Place cauliflower into food processor and pulse until you get a "cauliflower rice" constancy.
  3. Transfer cauliflower to a microwave-safe dish and microwave on high for 3 minutes. This steams the cauliflower.
  4. Once cooked, transfer cauliflower again to a tea towel lined bowl. Allow to cool for at least 5 minutes. When cool enough to handle, gather up the towel and squeeze the cauliflower into a ball -- and continue to squeeze! I can't stress enough how important it is to squeeze ALL the liquid out of the cauliflower. You should have about 1/2 cup of liquid when you are done. The end result is a ball of cauliflower "flour".
  5. In a mixing bowl combine cauliflower, shredded monterey jack cheese, egg white, coconut flour, seasonings and salt. Mix with hands until ingredients are well incorporated.
  6. On a parchment lined baking sheet flatten out dough, shaping into a thin round disk, about 1/4" thick.
  7. Bake in a 450° oven for 10-15 minutes or until it begins to turn golden.

Assemble the pizza.

  1. Once baked, rub olive oil, minced garlic and salt over the crust.
  2. Add the remaining toppings to the pizza..
  3. Bake again at 450°F for 10 minutes or until cheese has melted slightly and onions have cooked.
  4. Remove pizza from oven and allow to cool slightly before slicing.

Nutrition Information (approximate for 1 whole pizza):

330 calories - 20g Protein, 31g Carbohydrates (11g Fiber), 14g Fat

Posted on May 8, 2017 and filed under Recipes, Vegetables/Sides, Baking.

Vanilla Protein Cookies

Vanilla Protein Cookies | My Engineered Nutrition

So confession: I first made these cookies like 2 months ago and I'm just now sharing the recipe with you - eeep! Sorry, life just kinda got in the way (you know, I jetted off to Iceland and all) and I selfishly kept these cookies all to myself.

Today I'm FINALLY sharing the recipe and you definitely do not want to miss out on these Vanilla Protein Cookies!

Vanilla Protein Cookies | My Engineered Nutrition

Admittedly, when I first set out to make these cookies I was actually attempting to make an edible cookie dough. Well, it was a bit of a flop and it just didn't have the texture I wanted. However...I added a few additional ingredients, threw them on a cookie sheet then into the oven and....voilà! COOKIES!

The texture of these kind of remind me of those pillowy soft sugar cookies with icing and sprinkles that are sold in almost every major grocery store. You know the ones I'm talking about? The texture of these cookies is kind of dense yet also very soft. 

There are only 9 ingredients in these cookies and they are gluten and egg-free! The main ingredient is Vanilla Pea Protein Isolate and I wouldn't recommend substituting this with any other type of protein. This definitely gives the cookies their soft, pillowy texture and that is what MAKES these cookies. Pea protein gives your batter a thickness you just can't get with whey protein. 

If you've never tried pea protein I highly recommend you give it a taste! Use the code 'MYENG' for 5% off your order at True Nutrition

Vanilla Protein Cookies | My Engineered Nutrition

Vanilla Protein Cookies

Prep Time: 15 minutes

Bake Time: 16-18 minutes

Servings: 16 cookies

Ingredients:

  • 3 tbsp butter, softened
  • 1/2 c. coconut palm sugar
  • 3 tbsp unsweetened applesauce
  • 1 tsp vanilla
  • 3 scoops vanilla pea protein (3/4 c)
  • 1/2 c. all-purpose baking flour (I used gluten free Bob's Redmill 1-to-1 Flour)
  • 1/2 tsp baking powder
  • 1/4 tsp salt
  • 1/2 c. nondairy milk (cashew, almond, etc.)
  • Sprinkles!

Directions:

  1. Preheat oven to 375°F. Line a cookies sheet with parchment paper and set aside. 
  2. In a stand mixer or a large mixing bowl, combine butter and coconut palm sugar. Using the stand mixer or a hand electric mixer cream the butter with the sugar. Add applesauce and vanilla, mix to combine.
  3. In a smaller mixing bowl, combine all dry ingredients. Add dry ingredients to wet and mix until well incorporated. Add nondairy milk and mix until a thick cookie doughforms.
  4. Roll dough into 16 equal balls and space out evenly on the cookie sheet. Take each ball and small flat between palms or you can use your thumb and press down each ball to a flat cookie. Because of consistency of the dough these cookies don't spread larger than what they go into the oven as. Add sprinkles at this point should you want them!
  5. Place in oven and bake for 16-18 minutes. Remove from oven and allow to cool for 5-10 minutes before eating. 

Nutritional Information (1 cookie)

77 calories - 5 g Protein, 9.5 g Carbohydrates, 2.3 g Fat

Posted on April 20, 2017 and filed under Baking, Recipes, Sweet Treats, Protein Powder.