Posts filed under Vegetables/Sides

Greek Cauliflower Crust Pizza

To Celebrate My Engineered Nutrition's 2nd Birthday, I'm bringing it back with another Cauliflower Crust Pizza! The first recipe I started the website with, enjoy!

Greek Cauliflower Crust Pizza | My Engineered Nutrition

Can you believe that My Engineered Nutrition just turn TWO on May 5th?! 

If you are thinking "Wow! No I can't believe it!" you are in good company, as I couldn't believe it either. So much so, that the actual birthday came and went before I even realized it...

Greek Cauliflower Crust Pizza | My Engineered Nutrition

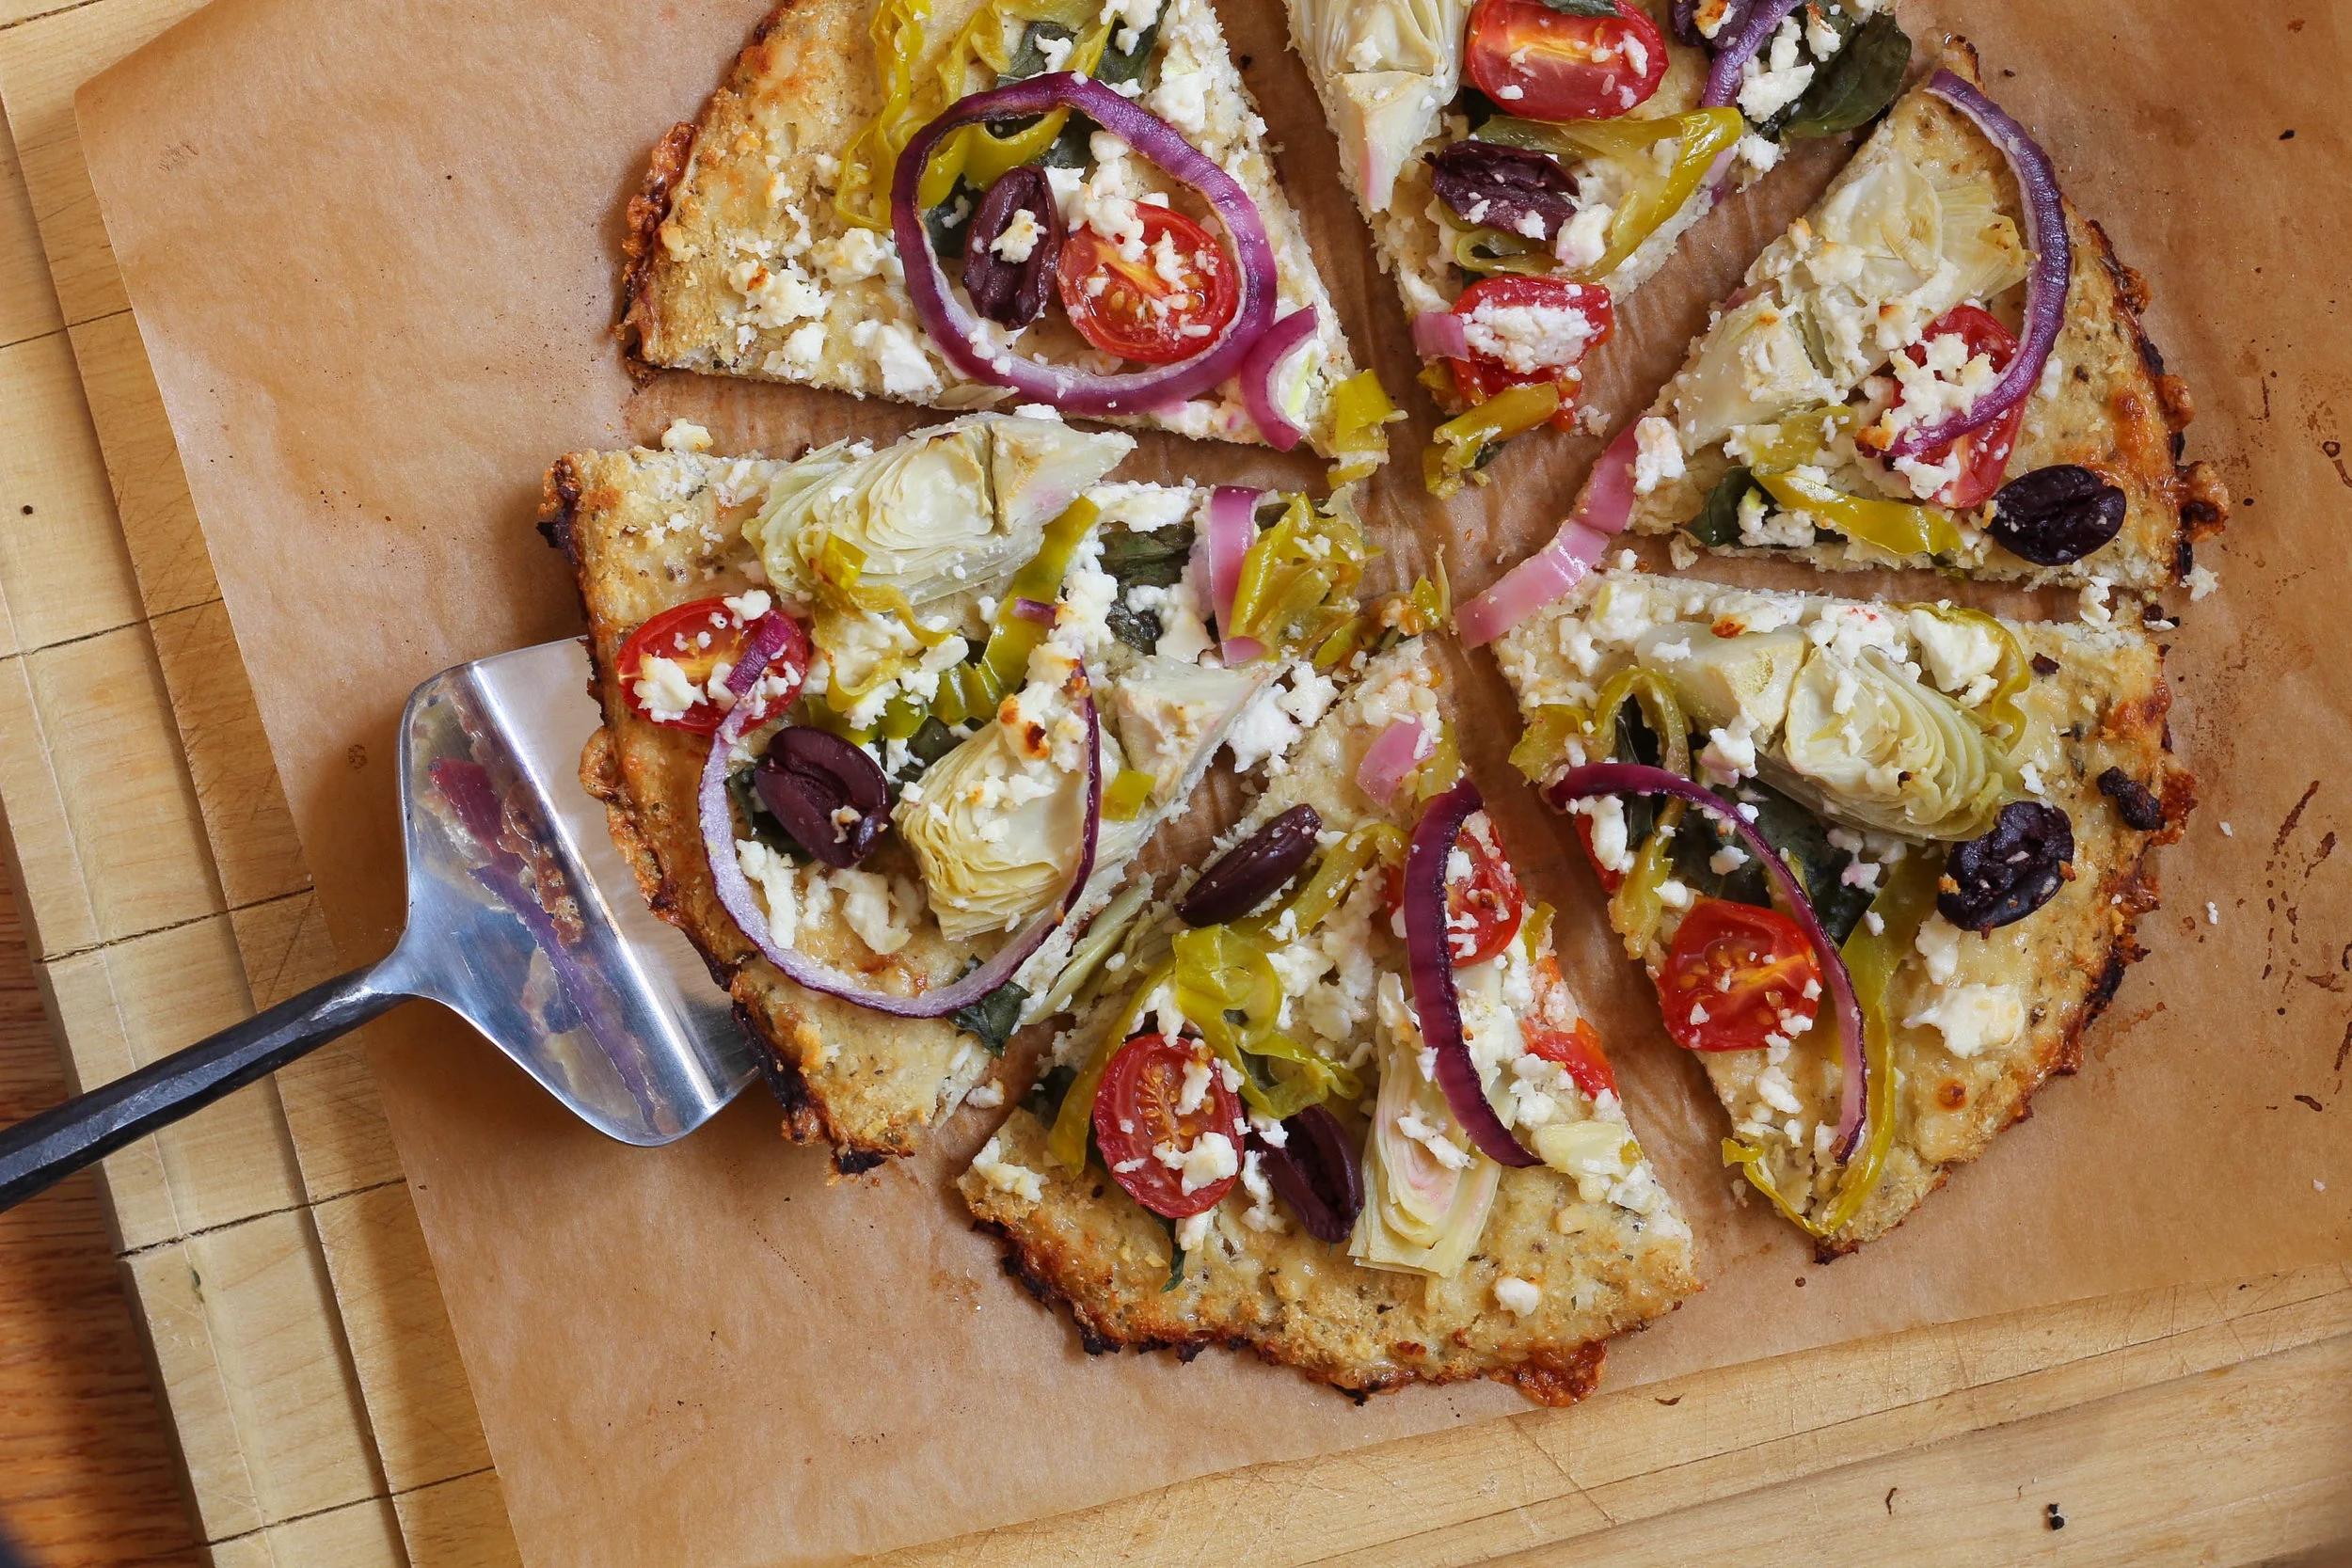
But after shortly realizing it was my baby website's birthday, I got to the kitchen and created something I hope you love as much as I do. It seemed fitting to celebrate the 2nd year of my blog with an original: Cauliflower Crust Pizza. That's right, I love my original BBQ Chicken Pizza so much I had to do a spinoff! While I would love to take credit for coming up with this idea all on my own, it was actually a recommendation by my bestie. I often turn to her to ask her what I should make next because she's made many of my recipes and we share similar tastes (i.e. we both love food...a lot). 

She mentioned that she's been into making Greek pizzas lately and I knew I had to copy that. I am part Greek after all, and I grew up eating this familiar profile of flavors. There is no traditional pizza sauce to be found on this pizza, instead the cauliflower crust is topped with olive oil and fresh garlic. Then, it is really a free form of whatever toppings you are feeling or have on hand! For this little number, I used feta cheese, artichoke hearts, kalamata olive, pepperoncini, red onions, grape tomatoes and basil...whew, that's a mouthful. You'll notice I don't have exact measurements for the ingredients below - let's not overcomplicate things. I've made things extra simple too with my step-by-step guide to making the Cauliflower Crust

Greek Cauliflower Crust Pizza | My Engineered Nutrition

Seeing that it IS My Engineered Nutrition's 2nd birthday, I figured I'd share some fun stats! I am an engineer after all, and I love nothing more than looking at analytics and numbers.

In total, I've had over 104,000 page views in the last 2 years. Wow. Just wow. THANK YOU to everyone who supports me in my fun little hobby. It means the world to me.

My Top 10 Recipes over the last 2 years were:

  1. Pumpkin Protein Donuts (over 18,000 views!!)
  2. Cajun Baked Salmon
  3. Sweet Potato Stacks
  4. Fluffy Protein Pancakes
  5. Banana Chocolate Chip Protein Muffins
  6. How to Build an EPIC Cheese and Charcuterie Board
  7. Coffee Cake Protein Muffins
  8. Roasted Chicken Breast
  9. Chocolate Coconut Protein Donuts
  10. BBQ Chicken Pizza with Cauliflower Crust

Some of these really surprised me for being in the Top 10 and others I'm not surprised at all. I did slow down at posting and only brought you 14 new recipes this year. I'm hoping to be more regular this year and my goal is to post at least two recipes per month! 

As always, I'd love to hear your suggestions for recipes! Shoot me an email at myengineerednutrition@gmail.com

Greek Cauliflower Crust Pizza | My Engineered Nutrition

Greek Cauliflower Crust Pizza

Prep Time: 20-25 minutes

Bake Time: 20-30 minutes

Ingredients

For the cauliflower crust

  • 1 small to medium head of cauliflower, yielding about 3.5 cups flowerets (350g)
  • 1/3 cup shredded fat-free or low-fat monterey jack cheese (1.5 oz)
  • 1 egg white
  • 1 tbsp coconut flour
  • 1 tsp italian seasoning (equal parts dried oregano, basil, thyme and rosemary)
  • 1/4 tsp salt

For the pizza toppings

  • 1 tsp extra virgin olive oil
  • 1 tsp fresh garlic, minced
  • Salt
  • 1 oz feta cheese, crumbed
  • Artichoke hearts (about 2 whole canned, sliced)
  • Red onion, sliced
  • Pepperoncini, sliced
  • Grape tomatoes, halved
  • Fresh basil, sliced
  • Kalamata olives, halved

Directions

First, start with the the cauliflower crust. You can follow my step-by-step instructions here: Cauliflower Crust How-To

  1. Preheat oven to 450°F. 
  2. Chop cauliflower into small flowerets, discarding of leavings and stem. Place cauliflower into food processor and pulse until you get a "cauliflower rice" constancy.
  3. Transfer cauliflower to a microwave-safe dish and microwave on high for 3 minutes. This steams the cauliflower.
  4. Once cooked, transfer cauliflower again to a tea towel lined bowl. Allow to cool for at least 5 minutes. When cool enough to handle, gather up the towel and squeeze the cauliflower into a ball -- and continue to squeeze! I can't stress enough how important it is to squeeze ALL the liquid out of the cauliflower. You should have about 1/2 cup of liquid when you are done. The end result is a ball of cauliflower "flour".
  5. In a mixing bowl combine cauliflower, shredded monterey jack cheese, egg white, coconut flour, seasonings and salt. Mix with hands until ingredients are well incorporated.
  6. On a parchment lined baking sheet flatten out dough, shaping into a thin round disk, about 1/4" thick.
  7. Bake in a 450° oven for 10-15 minutes or until it begins to turn golden.

Assemble the pizza.

  1. Once baked, rub olive oil, minced garlic and salt over the crust.
  2. Add the remaining toppings to the pizza..
  3. Bake again at 450°F for 10 minutes or until cheese has melted slightly and onions have cooked.
  4. Remove pizza from oven and allow to cool slightly before slicing.

Nutrition Information (approximate for 1 whole pizza):

330 calories - 20g Protein, 31g Carbohydrates (11g Fiber), 14g Fat

Posted on May 8, 2017 and filed under Recipes, Vegetables/Sides, Baking.

Brussels Sprouts Gratin

Brussels Sprouts Gratin | My Engineered Nutrition

If you follow me on Instagram, you saw my announcement a few weeks back that I'm now an Affiliate for BreadSRSLY!! Y'all know how much I love their gluten free sourdough. It's frequently featured in my daily meals (like this, or this, DEFINITELY this or that) and in past recipes like my Parmesan Garlic Croutons, Mom's Caesar Salad and this Ham, Leek & Sourdough Dressing. I can't wait to start dreaming up even MORE delicious ways to enjoy this bread. First up: this creamy, crunchy Brussels Sprouts Gratin!

Brussels Sprouts Gratin | My Engineered Nutrition

I actually first made this back in December for my 30th birthday weekend trip to Sonoma. I made this up as I went that weekend and after tasting the result, I knew it was only fair to you to recreate the recipe (and this time take notes). 

 'Gratin' is a French technique that simply means a dish with a browned crust of breadcrumbs. You know what makes a breadcrumb topping even better? Bacon. That's the start of this magical dish. 

The brussels sprouts are first roasted and then tossed in a bechamel sauce. Keeping with French techniques (they sure know what they are talking about), a bechamel is simply a white sauce made from a roux and milk. Don't let the fancy French words scare you! Roux = butter and flour. I'll break it down for you in the recipe, don't you worry.

To bring it all together the brussels tossed in the bechamel go into a baking dish and then are topped with breadcrumbs and bacon. Is your mouth watering yet? After a quick pop in the oven this side dish is ready to enjoy!  

Would you like to give BreadSRSLY a try? Use the code 'myengineerednutrition' with your order on their website and receive 10% off your order! 

Brussels Sprouts Gratin | My Engineered Nutrition

Brussels Sprouts Gratin

Prep Time: 25 minutes

Cook Time: 25 min

Servings: 6

Ingredients: 

Bechamel:

  • 2 tbsp butter
  • 2 tbsp gluten free flour, Bob's 1-to-1
  • 1 c reduced fat milk, 2%
  • Salt & Pepper

Gratin:

  • 6 oz BreadSRSLY sourdough bread, 3 slices toast
  • 6 cups brussels sprouts, cut into quarters 
  • 2 tsp olive oil, divided
  • 1 lemon, juiced
  • 1/4 tsp salt
  • 3 slices bacon

Directions:

  1. Preheat oven to 425°F. While the oven is preheating, toast your bread and prepare brussels sprouts by cutting them into quarters. Toss sprouts with 1 tsp olive oil, juice of one lemon and salt. Roast on a baking sheet in the oven for 10-15 minutes, giving them a toss halfway through roasting. This will give the sprouts a nice roast, but won't cook them all the way through.
  2. While the brussels are roasting, put the toasted bread into a food processor and pulse until breadcrumbs form. I personally like my breadcrumbs on the larger side, but you can go as large or small as you choose. On a different baking sheet, spread the breadcrumbs out in an even layer and toast in the oven (at the same time as the sprouts is fine) for about 5 minutes, just so they become a bit more dried out. 
  3. Remove breadcrumbs and brussels sprouts from the oven and set the aside. Reduce oven temperature to 350°F.
  4. Cook 3 slices of bacon until crisp. I fried my bacon in a skillet on stove top, but you can also do this step in the microwave. Blot with paper towels to remove excess grease and chop into smaller pieces. Combine breadcrumbs, bacon and remaining 1 tsp of olive oil in a bowl and toss.
  5. Next we make the béchamel! Warm your milk in a small sauce pan over medium high heat. While that is warming, in a sauté pan or a separate sauce pan (something with taller sides so that the sauce doesn't slop all over your stove!) melt the butter over medium high heat. Once melted add the flour, salt and pepper and cook, stirring constantly, until the paste begins to bubble. We want the butter+flour mixture to become a golden color, which will happen after about 2-4 minutes of cooking, but we don't want to let this burn. Pour in warmed milk and continue to stir the sauce. Raise to high heat and bring sauce to a boil. Lower heat and continue to cook for another 2-3 minutes while stirring. 
  6. In a large bowl combine roasted brussels sprouts and béchamel sauce. Toss so that the sprouts are evenly coated. Transfer into baking dish and top with breadcrumbs. Bake at 350°F for 20 minutes. To finish the gratin, raise heat and broil for 5 minutes or until crust is golden brown. Enjoy!

Nutritional Information (1 serving):

180 calories - 6.5 g Protein, 24 g Carbohydrates, 7.5 g Fat

Posted on March 11, 2017 and filed under Vegetables/Sides, Recipes.

Mom's Caesar Salad

Caesar Salad | My Engineered Nutrition

If you've followed me since the beginning of My Engineered Nutrition, then you know I have my fair share of family recipes. When you grow up following your mom and grandmother around the kitchen before you can even reach the counter, it's pretty inevitable that certain recipes will become so familiar you can almost taste them at their very mention.

If I had to trademark my mom with two recipes it would be her French bread and her Caesar salad.

Caesar Salad | My Engineered Nutrition

Without a doubt, every dinner party, big gathering or special occasion my mom would bake her famous French bread (and then proceed to burn it while toasting 9 times out of 10 hehehe) and make her Caesar salad, always in the same large wooden salad bowl.

Ahem...Mom, if you're reading this - I would like to claim said wooden bowl in your will :) 

This salad is so simple (but oh-so delicious) and can quite possibly accompany any meal - it's THAT good. This is a much lighter Caesar salad than what you are used to, which is why I love it. It has such a bright flavor thanks to all the lemon juice, making it especially great for a summer salad! Pssst, remembered those Parmesan Garlic Croutons I post a couple months back? Those are GREAT which this salad!

Caesar Salad | My Engineered Nutrition

Mom's Caesar Salad

Prep Time: 10 minutes

Servings: 4

Ingredients: 

Caesar Dressing (makes about 1/2 cup dressing)

  • 4 cloves garlic, minced
  • 1/4 tsp salt
  • 2 tsp Dijon mustard
  • 3 lemons, juiced
  • 2 tbsp extra virgin olive oil

For the salad:

Directions:

  1. In your large mixing bowl combine garlic and salt. With the back of a spoon, mash the garlic with the salt to make a paste. Add Dijon and lemon juice and whisk together. Slowly drizzle olive oil into bowl while whisking. (Alternatively, you can make this dressing in a small separate bowl or jar, prior to tossing with lettuce.)
  2. Add romaine lettuce to mixing bowl and toss to cover in dressing. Sprinkle with Parmesan cheese and divide salad between 4 plates. Finish with toasted Gluten Free Parmesan Garlic Croutons.

Nutritional Information (1 serving, does not include croutons or parmesan):

80 calories - 1 g Protein, 4 g Carbohydrates, 7 g Fat

Posted on July 29, 2016 and filed under Vegetables/Sides, Recipes.

Low Carb Protein Biscuits

Low Carb Protein Biscuits | My Engineered Nutrition

In the time since I've started creating recipes with protein powders, I've experimented with a wide variety of different powder types. While each powder yielding a slightly different end product, but one constant remained: they were all sweet baked goods. This isn't really a surprise, however, given that most of the time you think of flavored powders, which have also been sweetened.

The beauty of baking with protein powder is the ability to substitute a flour with protein powder, sometimes significantly reducing the carbohydrates in a given recipe. Why should that only be limited to desserts and breakfast items? 

I've been on a mission answer this question by creating a savory protein-packed baked good!

Low Carb Protein Biscuits | My Engineered Nutrition

Not only is this recipe the FIRST of my experiments in the savory, non-sweet realm of baking with protein powder, it is also my first successful recipe attempt using Beef Protein Isolate!

Now, before you go getting skeptical of this recipe because of the fact it uses a protein powder you likely aren't familiar with, let me clear the air - NO, this does not taste like BEEF.

Low Carb Protein Biscuits | My Engineered Nutrition

In fact, I've found that unflavored Beef Protein Isolate is actually quite neutral in taste. This pairs so very nicely with the other main star of these biscuits: coconut flour. I personally love baked goods that use coconut flour - I'm a huge fan of the nutty flavor it brings to the final product. Coconut flour is gluten free, low in carbohydrates and high in fiber! Win win win!

These biscuits seriously couldn't be simpler. I know many times baking can be daunting because of the precise measurements and detailed preparation. Not with these. It is as easy as mixing the wet and dry ingredients together into a dough (Warning: it will be sticky!) and forming said dough into biscuits. That's it! It is important to not the main difference between gluten free baking from baking with a wheat flour: the absence of gluten also means that your baked good won't rise or expand as much (or at all) as you may be used to. Simply put, the shape and size you make your biscuits pre-baking is how they will look post-baking. 

Low Carb Protein Biscuits | My Engineered Nutrition

The nutritional information for each biscuit is so incredible that you will have a hard time not pacing yourself when it comes to eating these! They are high and protein and fiber plus low in carbs and fat. They are great on their own but are also a fantastic option for creating a sandwich and using the biscuit cut in half as a bun.

Here's your solution for wanting to have your [biscuit] and eat it too! 

Low Carb Protein Biscuits | My Engineered Nutrition

Low Carb Protein Biscuits

Prep Time: 10 minutes

Cook Time: 20 minutes

Servings: 4 biscuits

Ingredients: 

  • 1/4 cup Beef Protein Isolate (1 scoop), unflavored
  • 1/2 cup coconut flour 
  • 1 tsp baking powder
  • 1/2 tsp salt
  • 2 eggs
  • 1/4 cup water

Baking Accessories:

  • Baking Sheet
  • Parchment Paper 

Directions:

  1. Preheat oven to 375°F. Prepare baking sheet by lining with parchment paper. 
  2. In a mixing bowl combine your dry ingredients: beef protein, coconut flour, baking powder and salt. Whisk to fully mix ingredients. Add eggs and water to the bowl and whisk until batter is smooth. This can be done in a stand mixer, with an electric hand mixer or by hand with a whisk.
  3. When all is combined, dough will be sticky - don't fret! Form the dough into 4 equal biscuits on your parchment paper lined baking sheet. Because this is a gluten free batter, the biscuits won't rise much from the original shape you form them into. 
  4. Place in oven to bake for 18-20 minutes. Biscuits are done baking when a toothpick inserted into the center of a biscuit comes out clean. Serve immediately or allow to cool completely and store in an air tight container for later.

Special Note: I've created this recipe based upon using Beef Protein Isolate. I have not tried other powder types so I can not guarantee the recipe will turn out the same using a different powder type (i.e. whey, pea, egg, etc.)

Nutritional Information (1 biscuit):

125 calories - 12 g Protein, 8.5 g Carbohydrates (5 g Fiber), 4.5 g Fat

Parmesan Garlic Croutons (Gluten-Free)

Parmesan Garlic Croutons | My Engineered Nutrition

Croutons are arguably the best part of a salad. Toasty, crunchy, garlicky cubes of bread which still have that chewy, soft center.

Let there be no mistake - these are not qualities you will find in store bought boxed croutons. Oh no, the best croutons are always homemade. 

Parmesan Garlic Croutons | My Engineered Nutrition

I personally cannot stand boxed croutons.  The are usually hard enough to break a tooth on and are covered in a powdered flavoring of some kind. If I'm going to be putting croutons on my salad, the only way that is happening is if they are homemade. Croutons are SO easy to make and I'm going to go ahead and say that 100% of the time, they will taste better than anything store bought (gasp!).

While any loaf I bread technically can be turned into a crouton, I prefer to use BreadSRSLY Gluten-Free Sourdough. I HIGHLY recommend using this bread as not only is it some of the best sourdough I've ever tasted...it is also gluten-free. Win-Win! 

Parmesan Garlic Croutons | My Engineered Nutrition

Aside from the bread, you only need garlic, olive oil and Parmesan cheese. It couldn't be any more simple than that.

I guarantee you won't ever think about buying boxed croutons again after you make these once. Throw these on a salad, your favorite bowl of soup...or simply eat them freshly toasted and warm out of the oven. I don't judge! 

Parmesan Garlic Croutons | My Engineered Nutrition

Parmesan Garlic Croutons (Gluten-Free!)

Prep Time: 5 minutes

Bake Time: 15 minutes

Servings: 4

Ingredients: 

  • 3 cups sourdough bread (gluten free), cut into 1" cubes - I recommend BreadSRSLY gluten-free sourdough, but any sourdough would do
  • 4 cloves garlic, minced
  • 1 tbsp extra virgin olive oil
  • 4 tbsp Parmesan cheese, grated

Baking Accessories:

  • Baking Sheet
  • Parchment Paper 

Directions:

  1. Preheat oven to 375°F. Prepare baking sheet by lining with parchment paper. 
  2. Slice bread into 1" cubes. This should yield about 3 cups of bread. In a large mixing bowl, toss bread with olive oil and garlic. 
  3. Transfer bread to baking sheet and bake for 5 minutes. After 5 minutes, toss croutons on baking sheet and return to oven for another 5 minutes. 
  4. After a total of 10 minutes of baking, sprinkle cheese over croutons and return to oven for a final 5 minutes to melt cheese and finish toasting croutons. 
  5. Remove from oven and add to dish of your choice. If you would like to reserve for later use, these keep well stored in an airtight container. 

Nutritional Information (1 serving):

155 calories - 4 g Protein, 23 g Carbohydrates, 5.5 g Fat

Posted on May 26, 2016 and filed under Recipes, Vegetables/Sides, Baking.